A Hello World Applet
Today, we're going to go back to the simple Hello World applet we made Thursday and add some definitions so that the button does something. To do that, we're going to need to talk about a few more fundamental ideas first. We'll start with interfaces.
Interfaces are a very important feature of Java, and we won't have time to get into too much detail about them. In particular, we won't be defining our own interfaces. But we will use at least one interface, and they're important, so let's talk a little bit about them here. Note that even though we're talking about them in the context of a web applet, interfaces are a fundamental feature of Java and not limited to just being used in applets.
The simple way to think about an interface is this: an interface is like an unimplemented class. It has a lot of the same features as a class, and the syntaxes for its definition and its use are very similar to those for classes. Both classes and interfaces have member variables and methods, but when someone defines an interface method, they can only write the declaration. They can say what kinds of inputs it takes, and what it outputs, and whether it's public, private, etc, but they're not allowed to say what the method does. This means when you implement* an interface, you must override all of its methods.**
*You "extend" a class by making a subclass, but you "implement" an interface.
**Unless the interface has default definitions, but that's a story for another semester.
Because you usually have to override all of an interface's methods, most interfaces don't have a lot of methods. Many only have one, and the name is often suggestible of what the method is. For example the interface Comparable only has one method, and it's called compareTo(). Any class that implements Comparable has to come with a definition of what it means to compare one element to another. For Strings, it's about alphabetical order. For objects that store dates or times, it's about chronological order. The real power of an interface is not in the methods it has, but in the methods of other classes that are written to use the interface. For example, there might be a sorting method that works for a list of any kind of Comparable objects. The method wouldn't care whether those objects are numbers or dates or strings, so long as you can compare two objects to see which is "bigger".
While a class can only extend a single superclass, it can implement as many interfaces as needed. This is how Java gets around not having multiple inheritance.
If we want our button to do something whenever it's pressed, then we need to tell the Java virtual machine to pay attention to the button, keeping watch on it and waiting for it to be pressed. We do this with something called a listener, which runs in the background, waiting for something to happen. If you don't have a listener object, you have to implement some sort of loop that just keeps checking for the user's input over and over again until something happens. And if you want something else to happen while you're waiting for that input, you have to have to get into the nitty gritty of multiple threads, which are beyond this class. In any case, a listener simplifies things considerably.
There are two types of occurrences that you can listen for. The first are simple events, and they cover low-level events such as a mouse click or a single keyboard press. At a higher level of abstraction are action events, which are occurrences generated by other objects when certain things happen. An action event might be associated to the press of a button, or a change being made to a slider bar. If you wanted to work only with events, then to deal with a button being pressed, you'd have to make an event listener that waited for a mouse click, and then you'd have to check to see if the mouse pointer was pointing to the right spot on the screen (i.e., to where the button is drawn) and that there weren't any menus or windows covering up the button. But many packages, especially the Swing package, come with ways of creating more complex action events. In particular, you can assign an action event to a JButton component, and Swing will handle all the low-level event-listening needed to decide when the button has been pressed. It also comes with instructions for other ways of "pressing" the button (such as hitting a shortcut key on the keyboard, or hitting Tab until the button is highlighted and then pressing Enter). We don't have to deal with all that, we just need to attach an action event to our button and make sure there's an ActionListener waiting to hear when the button has been pressed.
ActionListener is an interface with one method that needs to be overridden, and that's the method ActionPerformed() which shouldn't output anything and should take a single object of class ActionEvent as an argument.
So here's where we left our Hello World applet on Thursday. (Note that I simplified it a bit in the notes. I'll start with the simplified version.)
import javax.swing.*;

public class HelloWorld extends JApplet {
  public void init() {
    JPanel mainPanel = new JPanel();
    JLabel label1 = new JLabel("Hello World!");
    JButton button1 = new JButton("Push");

    mainPanel.add(label1);
    mainPanel.add(button1);
    add(mainPanel);
  }
}
This defines an applet with one label and one button, but the button doesn't do anything. We need to create an ActionListener to listen for the button to be pressed. First of all, we'll need to import the package java.awt which has all the definitions for ActionListners. While we're at it, let's import the subpackage java.awt.event, which has the definitions for ActionEvents. Now we could create a brand new object that implements the interface ActionListener, but since it's an interface, we can actually just add the functionality to any class that we're defining. The only class we've defined here is the applet itself: HelloWorld. You might not think of this as a class because it's a static class that has only one object (which is also called HelloWorld). But it is a class, so we can declare that it implements ActionListener. In any case, it makes sense (at least it does to me) to think of the applet as listening to its own buttons.
import javax.swing.*;
import java.awt.*;
import java.awt.event.*;

public class HelloWorld extends JApplet implements ActionListener {
  public void init() {
    JPanel mainPanel = new JPanel();
    JLabel label1 = new JLabel("Hello World!");
    JButton button1 = new JButton("Push");

    mainPanel.add(label1);
    mainPanel.add(button1);
    add(mainPanel);
  }
}
But if HelloWorld is going to implement ActionListener, then we have to override the actionPerformed() method to tell it what to do when it hears what it's listening for. What should we have it do? Let's add a label that keeps track of how many times the button has been pressed. When the button is pressed, we'll increase a variable (call it numberPushes) that stores the number of times its been pressed. We'll start with the the score label displaying nothing, and after the button has been pressed, we'll increase numberPushes and add the number to the score label.
import javax.swing.*;
import java.awt.*;
import java.awt.event.*;

public class HelloWorld extends JApplet implements ActionListener {
  public void init() {
    JPanel mainPanel = new JPanel();
    JLabel label1 = new JLabel("Hello World!");
    JButton button1 = new JButton("Push");
    JLabel scoreLabel = new JLabel("");
    int numberPushes = 0;

    mainPanel.add(label1);
    mainPanel.add(button1);
    mainPanel.add(scoreLabel);
    add(mainPanel);
  }

  public void actionPerformed(ActionEvent event) {
    numberPushes++;
    scoreLabel.setText("You have pushed the button " + numberPushes + " times.");
  }
}
Unlike when we worked with server-side applications, where the content of the page was static, only changing when the page was reloaded, we can change the text being displayed by a label whenever we want by using the setText() method.
Now if we try to compile this, we'll end up with some compiler errors that might look something like:
HelloWorld.java:20: error: cannot find symbol
    numberPushes++;
    ^
  symbol:   variable numberPushes
  location: class HelloWorld
HelloWorld.java:21: error: cannot find symbol
    scoreLabel.setText("You have pushed the button " + numberPushes + " times.");
                                                       ^
  symbol:   variable numberPushes
  location: class HelloWorld
HelloWorld.java:21: error: cannot find symbol
    scoreLabel.setText("You have pushed the button " + numberPushes + " times.");
    ^
  symbol:   variable scoreLabel
  location: class HelloWorld
3 errors
At first you might think that maybe we mistyped numberPushes and scoreLabel when we defined them, but if you look back at the code, that's not the case. What's going on here is that we defined numberPushes and scoreLabel inside the definition of the init() method, which means that they're only accessible from inside that method. If we want to use these variables in other HelloWorld methods, we should define them as variables that are members of the HelloWorld class, not as local variables inside one of its methods. While we're at it, we might as well move all of the variables that might get used by other methods out of the init() method.
import javax.swing.*;
import java.awt.*;
import java.awt.event.*;

public class HelloWorld extends JApplet implements ActionListener {

  JPanel mainPanel = new JPanel();
  JLabel label1 = new JLabel("Hello World!");
  JButton button1 = new JButton("Push");
  JLabel scoreLabel = new JLabel("");
  int numberPushes = 0;

  public void init() {
    mainPanel.add(label1);
    mainPanel.add(button1);
    mainPanel.add(scoreLabel);
    add(mainPanel);
  }

  public void actionPerformed(ActionEvent event) {
    numberPushes++;
    scoreLabel.setText("You have pushed the button " + numberPushes + " times.");
  }

}
Now this will compile, but the button still won't do anything because we haven't told the listener what to listen for. Now you might be expecting that we'd call one of the ActionListener's methods, but remember that ActionListener is an interface, so it doesn't come with a whole lot of methods (in fact, it only comes with the one method: actionPerformed()). Most of the functionality of an interface comes from what other classes do with it. In this case, the class JButton has a method called addActionListener() that can be used to indicate that a particular ActionListener should be listening to the button. (As is suggested by the word add, you can have more than one ActionListener listening to the same button. You can also have the same ActionListener listening to several buttons, which we'll do later today.) Now remember that we decided that it was the applet HelloWorld itself that serves as our listener, and since we're still in the definition of the class HelloWorld, we can refer to it with the keyword this.
import javax.swing.*;
import java.awt.*;
import java.awt.event.*;

public class HelloWorld extends JApplet implements ActionListener {

  JPanel mainPanel = new JPanel();
  JLabel label1 = new JLabel("Hello World!");
  JButton button1 = new JButton("Push");
  JLabel scoreLabel = new JLabel("");
  int numberPushes = 0;

  public void init() {
    button1.addActionListener(this);

    mainPanel.add(label1);
    mainPanel.add(button1);
    mainPanel.add(scoreLabel);
    add(mainPanel);
  }

  public void actionPerformed(ActionEvent event) {
    numberPushes++;
    scoreLabel.setText("You have pushed the button " + numberPushes + " times.");
  }

}
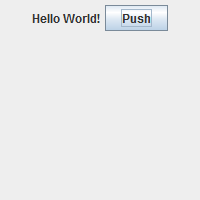
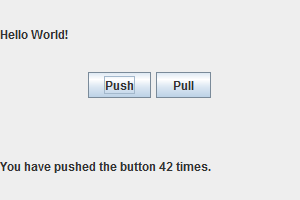
So now we can save the file, compile it, make sure our HTML file is including the applet, and load it up in a web browser. Before the button is pressed, it might look like this:
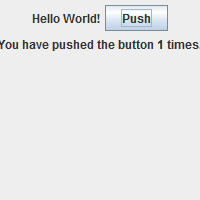
And after we press the button once, it looks like this:
It doesn't quite fit inside the applet's display frame, but we can fix that. Remember that the size that the applet is displayed in is determined in the html file that called it. So we can update our hello.html file to indicate a width of 300 pixels, instead of just 200:
<html>
<head>
 <title>Hello World</title>
</head>
<body>

 <h1>A Hello World Applet</h1>

 <object type="application/x-java-applet" width=300 height=200>
  <param name="code" value="HelloWorld"/>
  Applet failed to load.
 </object>


</body>
</html>
And now it fits better:
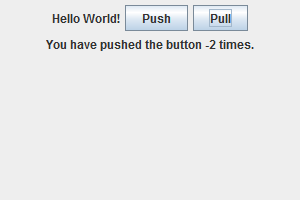
But what if we wanted to have more than one button, with each button doing something different? For example, let's say that we wanted to have a second button (maybe a pull button) that decreased the number of "pushes" when it was pressed. There are at least two different options here. We could create a second static class that implemented ActionListener, give it a separate actionPerformed() method, and told the second button that this new listener was listening to it. But this seems like overkill to me. Instead, we can tell both buttons that HelloWorld will be listening to them, and we'll just add some code into actionPerformed() that checks to see which button was pushed before deciding what to do.
import javax.swing.*;
import java.awt.*;
import java.awt.event.*;

public class HelloWorld extends JApplet implements ActionListener {

  JPanel mainPanel = new JPanel();
  JLabel label1 = new JLabel("Hello World!");
  JButton button1 = new JButton("Push");
  JButton button2 = new JButton("Pull");
  JLabel scoreLabel = new JLabel("");
  int numberPushes = 0;

  public void init() {
    button1.addActionListener(this);
    button2.addActionListener(this);

    mainPanel.add(label1);
    mainPanel.add(button1);
    mainPanel.add(button2);
    mainPanel.add(scoreLabel);
    add(mainPanel);
  }

  public void actionPerformed(ActionEvent event) {
    if( /* button1 was pressed */) {
      numberPushes++;
    } else if( /* button2 was pressed */ ) {
      numberPushes--;
    }
    scoreLabel.setText("You have pushed the button " + numberPushes + " times.");
  }

}
We still need to fill in the conditions that tell which button was pressed. Remember that the actionPerformed() method has an argument that we can use. The input is an object (which we called event) of type ActionEvent. The class ActionEvent comes with many useful methods. Right now, the one we want is getActionCommand(), which returns a the command string associated with the action. Remember that the action is generated by one of our buttons when it is pressed. We can change the command string that the action generated by a button has by using the method setActionCommand(). If we don't change it, it defaults to the text that's written on the button itself. In our case, that means that the action generated by button1 has the command string "Push", and the action generated by button2 has the command string "Pull".
This means that we can tell which button was pressed by looking at the string event.getActionCommand() and seeing whether it's equal to "Push" or "Pull". Note that in class, we manually set the command strings for our buttons using setActionCommand(), but that's not strictly necessary unless the buttons both have the same text on them.*
*In that case, you'd want to add lines like button1.setActionCommand( "push" ); and button2.setActionCommand( "pull" );.
You can see the object-oriented programming concept of encapsulation at work here. We can't access the ActionEvent's command string directly, but we can retrieve it's contents with the accessor method (better known as a "getter") getActionCommand() and we can change it with the mutator method (better known as a "setter") setActionCommand().
Now if you were paying attention when we talked about identity versus equality, then you might remember that writing if( event.getActionCommand() == "Push" ) isn't going to work. The operator == tests for identity, so even if the two strings have the same content (meaning that they're equal), they probably won't be referring to the same exact object in the virtual machine's memory, so they won't be identical. So instead, we use the String method .equals() and write if( event.getActionCommand().equals("Push") ):
import javax.swing.*;
import java.awt.*;
import java.awt.event.*;

public class HelloWorld extends JApplet implements ActionListener {

  JPanel mainPanel = new JPanel();
  JLabel label1 = new JLabel("Hello World!");
  JButton button1 = new JButton("Push");
  JButton button2 = new JButton("Pull");
  JLabel scoreLabel = new JLabel("");
  int numberPushes = 0;

  public void init() {
    button1.addActionListener(this);
    button2.addActionListener(this);

    mainPanel.add(label1);
    mainPanel.add(button1);
    mainPanel.add(button2);
    mainPanel.add(scoreLabel);
    add(mainPanel);
  }

  public void actionPerformed(ActionEvent event) {
    if( event.getActionCommand().equals("Push") ) {
      numberPushes++;
    } else if( event.getActionCommand().equals("Pull") ) {
      numberPushes--;
    }
    scoreLabel.setText("You have pushed the button " + numberPushes + " times.");
  }

}
Now this code is ready for compiling and testing. Remember that if you're using Firefox, you'll need to call up the Java console and hit the X key to clear the cache so that the Java plug-in loads the new version of the applet, and not the one stored in the cache. If you're using Chrome, you'll have to completely restart the browser to clear the cache.
Note that if we'd made two separate listeners, we would've had to write the line for printing the score twice. Of course, we could also have fixed that by putting the score-writing code into its own method and just called that. But in any case, unless you have a good reason* for writing two separate listeners, I would just make one listener.
*If the first button's action takes a long time to execute and you want to allow someone to press a second button before button 1 is finished doing its thing, then you might want to have a separate listener for the two buttons.
Now that we're able to make our applet actually do something, it's time to start thinking about how it should look. At the moment, our applet has four components (a label, followed by two buttons, and then another label), and they're positioned on their panel using Swing's default layout manager: FlowLayout. Flow means that components are placed in a row from left to right, until one of the items doesn't fit anymore, and so is moved down to start the next row. This is also the default way that things are positioned on a web page. There is one small difference, however. When you create a new FlowLayout, you can specify the alignment to be LEADING (left-aligned*), TRAILING (right-aligned*), or CENTER (centered). The default for FlowLayout is CENTER, but the default for HTML is left-aligned.
Technically, "leading" is only the same as left-aligned and "trailing" is only the same as right-aligned when you're using a script that is written from left-to-right. But if you were writing using the Hebrew alphabet or the Arabic script (both are written from right-to-left), things would be different.
But when we make a JPanel, we can specify what kind of layout manager we want. There are a number of different options, but we'll focus on GridLayout today. A GridLayout divides the panel up into equal-shape, equal-size rectangles and the components that are placed in those rectangles automatically grow to fill up the rectangle. As you add components to a GridLayout, the rectangles are filled in from left to right, and then from top to bottom.
To demonstrate, let's take our four existing components and put them into a 2×2 grid using the a layout manager of type GridLayout. In this case, there's really only two steps to the process: create a new layout manager using the GridLayout constructor (setting the number of columns and the number of rows to 2), and then use the JPanel setter method setLayout() to ensure that mainPanel uses mainLayout as its layout manager.
import javax.swing.*;
import java.awt.*;
import java.awt.event.*;

public class HelloWorld extends JApplet implements ActionListener {

  JPanel mainPanel = new JPanel();
  JLabel label1 = new JLabel("Hello World!");
  JButton button1 = new JButton("Push");
  JButton button2 = new JButton("Pull");
  JLabel scoreLabel = new JLabel("");
  int numberPushes = 0;

  public void init() {
    GridLayout mainLayout = new GridLayout(2,2);
    mainPanel.setLayout(mainLayout);

    button1.addActionListener(this);
    button2.addActionListener(this);

    mainPanel.add(label1);
    mainPanel.add(button1);
    mainPanel.add(button2);
    mainPanel.add(scoreLabel);
    add(mainPanel);
  }

  public void actionPerformed(ActionEvent event) {
    if( event.getActionCommand().equals("Push") ) {
      numberPushes++;
    } else if( event.getActionCommand().equals("Pull") ) {
      numberPushes--;
    }
    scoreLabel.setText("You have pushed the button " + numberPushes + " times.");
  }

}
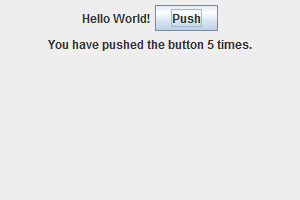
And that's really all there is to it. Before, the applet looked something like this:
And now it looks more like this:
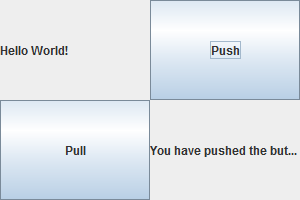
It's not much of an improvement; in fact it actually looks worse. But it demonstrates one of the tools we can use to get a nicer layout. In addition to the layout managers, we can divide our main panel up into a number of smaller subpanels, and each of those subpanels can have their own layout manager. So suppose I wanted to have the first label displayed on top and the score label displayed at the bottom, with the two buttons in the middle, positined next to each other. Then I could set up a 3×1 GridLayout on the main panel, put the first label in the first (top) spot, a subpanel for the buttons in the second (middle) spot, and the score label in the third (bottom) spot. And within that button panel, I can use whatever manager I want. In this case, I'll just use the default FlowLayout because that will position them next to each other and centered.
import javax.swing.*;
import java.awt.*;
import java.awt.event.*;

public class HelloWorld extends JApplet implements ActionListener {

  JPanel mainPanel = new JPanel();
  JPanel buttonPanel = new JPanel();
  JLabel label1 = new JLabel("Hello World!");
  JButton button1 = new JButton("Push");
  JButton button2 = new JButton("Pull");
  JLabel scoreLabel = new JLabel("");
  int numberPushes = 0;

  public void init() {
    GridLayout mainLayout = new GridLayout(3,1);
    mainPanel.setLayout(mainLayout);

    button1.addActionListener(this);
    button2.addActionListener(this);

    mainPanel.add(label1);
    buttonPanel.add(button1);
    buttonPanel.add(button2);
    mainPanel.add(buttonPanel);
    mainPanel.add(scoreLabel);
    add(mainPanel);
  }

  public void actionPerformed(ActionEvent event) {
    if( event.getActionCommand().equals("Push") ) {
      numberPushes++;
    } else if( event.getActionCommand().equals("Pull") ) {
      numberPushes--;
    }
    scoreLabel.setText("You have pushed the button " + numberPushes + " times.");
  }

}
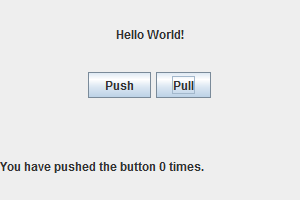
And here's the result:
But maybe you wanted the "Hello World!" message to be centered. Note that we didn't quite get to this in class. There are many ways to achieve this. Probably the simplest is to add a parameter to the JLabel constructor when we created the label: new JLabel( "Hello World!", SwingConstants.CENTER ) This won't center the label relative to whatever panel it's inside of.* What it does is center the text relative to the label itself.
*Which isn't what we want in this case anyway, because since we're using GridLayout, the label stretches to fill up the entire top third of the frame, so it doesn't even make sense to talk about centering the label.
import javax.swing.*;
import java.awt.*;
import java.awt.event.*;

public class HelloWorld extends JApplet implements ActionListener {

  JPanel mainPanel = new JPanel();
  JPanel buttonPanel = new JPanel();
  JLabel label1 = new JLabel( "Hello World!", SwingConstants.CENTER );
  JButton button1 = new JButton("Push");
  JButton button2 = new JButton("Pull");
  JLabel scoreLabel = new JLabel("");
  int numberPushes = 0;

  public void init() {
    GridLayout mainLayout = new GridLayout(3,1);
    mainPanel.setLayout(mainLayout);

    button1.addActionListener(this);
    button2.addActionListener(this);

    mainPanel.add(label1);
    buttonPanel.add(button1);
    buttonPanel.add(button2);
    mainPanel.add(buttonPanel);
    mainPanel.add(scoreLabel);
    add(mainPanel);
  }

  public void actionPerformed(ActionEvent event) {
    if( event.getActionCommand().equals("Push") ) {
      numberPushes++;
    } else if( event.getActionCommand().equals("Pull") ) {
      numberPushes--;
    }
    scoreLabel.setText("You have pushed the button " + numberPushes + " times.");
  }

}
Here's what that looks like:
SwingConstants.CENTER is actually a constant integer* that many different Swing classes use when they want to pass information about alignment. It takes fewer resources to pass an int than it does to pass a String, which is why Swing uses these constants. Other important constants are TRAILING and LEADING for communicating horizontal alignment, TOP and BOTTOM for communicating vertical alignment, and VERTICAL and HORIZONTAL for communicating orientation.
SwingConstants.CENTER happens to be 0, in case you were curious.
You can also change the horizontal alignment of labels and other Swing components using the setHorizontalAlignment() method.
If you want to format the text inside of a Swing component (such as a label or button), you can use HTML tags, but only if you use <html>...</html> tags in your string. So if you wanted to increase the font size by two of "Hello World!" and make it red, here's how that would work:
import javax.swing.*;
import java.awt.*;
import java.awt.event.*;

public class HelloWorld extends JApplet implements ActionListener {

  JPanel mainPanel = new JPanel();
  JPanel buttonPanel = new JPanel();
  JLabel label1 = new JLabel( "<html><font size=+2 color=red>Hello World!"
                                + "</font></html>", SwingConstants.CENTER );
  JButton button1 = new JButton("Push");
  JButton button2 = new JButton("Pull");
  JLabel scoreLabel = new JLabel("");
  int numberPushes = 0;

  public void init() {
    GridLayout mainLayout = new GridLayout(3,1);
    mainPanel.setLayout(mainLayout);

    button1.addActionListener(this);
    button2.addActionListener(this);

    mainPanel.add(label1);
    buttonPanel.add(button1);
    buttonPanel.add(button2);
    mainPanel.add(buttonPanel);
    mainPanel.add(scoreLabel);
    add(mainPanel);
  }

  public void actionPerformed(ActionEvent event) {
    if( event.getActionCommand().equals("Push") ) {
      numberPushes++;
    } else if( event.getActionCommand().equals("Pull") ) {
      numberPushes--;
    }
    scoreLabel.setText("You have pushed the button " + numberPushes + " times.");
  }

}
I'm not sure what would happen if you tried some of the more complex HTML tags, so I'd stick to the ones that affect what text looks like. Oddly, this means that you'll probably be making use mostly of HTML tags that are now deprecated. HTML5 recommendations encourage you to use cascading style sheets for anything related to appearance, so you probably shouldn't be using tags like <font> in actual web pages. But inside of Swing components, feel free to go nuts with them.