
Using SALSA
Components
Salsa is a program that simulates many species of artificial creatures (critters) in a world. That world and each critter species are described in parameter files that can be edited using a text editor. The program itself is controlled from the graphical interface using menus and buttons.
Interface
You will run the program from its graphical interface. You are also able to modify worlds and critters by editing the files that specify those worlds and critters.
Windows
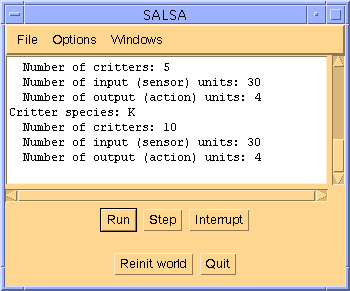
Several windows appear when you run the program. Salsa is the main controller. You can load and save worlds and critters from here. You can also begin, pause and end a run. Finally, you can set a few parameters and look at some of the messages that the simulation produces (such as how many time steps have elapsed in the simulation, or what critter/environment files were last loaded). The Salsa window must be selected (click on it) in order to access the menus.
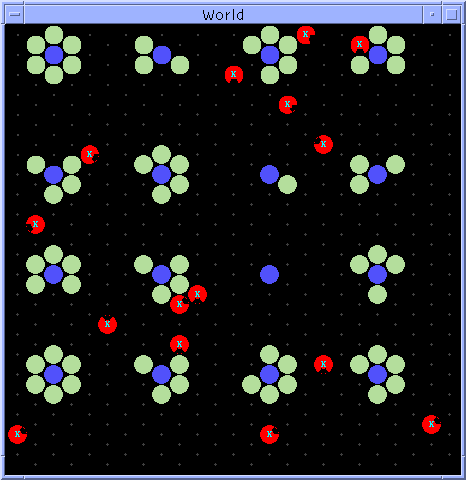
Another window that appears is the world window, which will show the current location of rocks and critters in the simulation. It is initially empty. The last window that (usually) appears is a placement window that allows you to place rocks and "fertile areas" (places where food will grow) in the world.
Once the simulation is ready to begin (a world has been created/loaded and critters have been added to it), three windows will appear: STM, reinforcement, and strength&age. STM shows what each critter's current memory looks like (its sensor and action values). reinforcement shows the rewards and punishments for critter, due to each particular cost (e.g., hitting a wall) or benefit (e.g., eating food). strength&age shows each critter's current strength and how old it is. When a critter's strength reaches 0, it is dead.
In each of these three windows (STM, reinforcement, strength&age), the critters are ordered from top-to-bottom in the same order they were loaded. So, if you loaded 5 critters named "L" and then you loaded 3 named "T", the top 5 information bars of each of these windows would correspond to the "L" critters and the last 3 bars would be the "T" critters.
SALSA window
This is the main control center. You can load in worlds and critters; create new worlds; start, pause, and step through runs, and set a few general parameters. You can also read messages from Salsa, indicating what critters and environments it has just loaded, what time step the simulation ended at, and various other events. You can determine how much output appears in this message window by setting the "verbosity" from the Options menu item, Set display parameters.
World window
Displays the current contents of the world.
Reinforcement window
Shows the reinforcement of each critter, broken down into punishments and rewards for each action. These are proportions of the total reinforcement received by the critter over its lifetime (the proportions shown are reset each time you press the Run button). If the rewards bar is longer than the punishments bar, the critter is at least receiving an overall positive reinforcement, and thus its strength should be increasing.
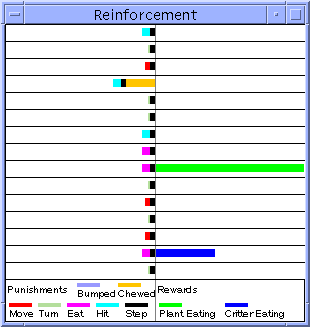
You can click on any critter's information bar in this window and the critter it belongs to will become highlighted in cyan for a moment. It's best to Interrupt the run and view the critters this way.
Strength and age window
Shows the strength (green) and age (magenta) for each critter. If strength gets to 0 and the simulation is set so that critters don't die (they are "reincarnated"), then a new critter will take its place with a high strength again. You can tell that this has happened since the age bar will be reset to 0. Old critters are a sign that those critters have learned how to survive well in their world.
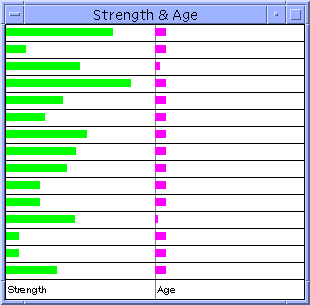
As with the reinforcement window, each critter's information bar can be clicked and the corresponding critter in the world will light up.
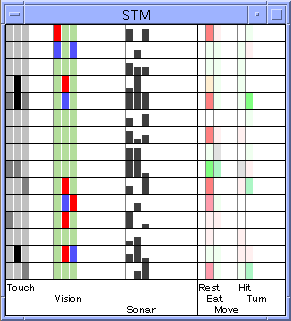
STM window
The state of each critter's input and output are shown here. These would be the values for the last timestep, so you can step through the simulation, watch an action, and then look at the corresponding STM bar for that critter to see why it did that. If a critter doens't have a particular sensor or effector, it won't have any graphical information in that column. Touch has 5 values displayed in the same colors as the thing being touched (nothing, soft plant, hard plant, critter, rock). Vision is in color, so each bar will be one of the colors in the world that the critter is seeing. Sonar has 5 values, and the darkness of the bar corresponds to how close the object detected is (darker = closer).
The states of the effectors are shown on the right hand side of the display. Each possible action gets a separate bar, since each action is represented by a single neuron in the critter's neural net. The bar's color indicates how active that particular neuron is. No color is an activation of 0, red is negative (darker red is a larger negative number) and green is positive (darker green is a larger positive number).
Some actions have only one value, while others have multiple values. For examlpe, Eat requires one neuron. Move, on the other hand, requires as many neurons as the kinds of move for this critter. In the case below, critters can move only one space at a time, so only the first of 4 possible move columns shows any activation (the other spaces are there since other critters might have more movement possibilities). For each critter's information bar, you can see what its most likely output will be by looking for the action with the highest activation. In the case of the very first critter, Turn is slightly green, and this is the highest of all activations. So, the critter will most likely turn. However, since actions are probabilistic (even though they're biased), the critter might choose a different action than Turn this time.
As with the reinforcement window, each critter's information bar can be clicked and the corresponding critter in the world will light up.
LTM Window
(Information on this window to come soon.)
Critter files
Each critter has a number of parameters associated with it, including its name, values for its sensors and effectors, and its learning parameters (learning rate, discount rate, exploitation rate). These parameters are all specified in a separate text file for each critter species. Once a critter has been added to the world, its parameters cannot be changed. However, a critter's parameter file can be changed, the world cleared, and critters of that type reloaded.
Each parameter has a name and is followed by a value. Usually, the value is an integer (only name gets a character value). Parameter names must be spelled correctly, although case (upper/lower case) doesn't matter. A parameter is separated from its value by spaces, tabs or newlines (pressing the return/enter key).
In addition to parameter name/value pairs, the file also contains lines that look like this:
// This critter can only turn one cell (60 degrees) at a time
turn     1
The first line is a comment. The second line is an actual parameter name and value pair. The comment is ignored; it is placed there so that a human can read this file later and perhaps understand what's going on a bit better. A comment begins with two front-slashes, //. Everything on the rest of the line is ignored. You can put comments anywhere you like. You can also use comments to "remove" a parameter temporarily, and then delete the // later to add the parameter back in:
// This critter can only turn one cell (60 degrees) at a time
//turn     1
In the lines above, the original comment is there, but now the parameter/value pair has been commented out. It is as if the parameter were deleted. This is a useful trick to use when making small changes since you don't have to remember every previous parameter change - just comment out the old one and put in a new one.
Each critter species gets a name, and you can see this name pasted on those critters' icons in the world. This is one single character, as in X. The file for critter X is called critsX by convention. You can call these files anything you want, however. If a critter's name is longer than 1 character, the rest of the name will be ingnored.
- name letter
- Critters of this type will all be labeled with letter.
For all sensor and effector parameters, if the parameters for that sensor/effector are deleted or commented out, then that sensor/effector will not exist in the critters (except that all critters will be able to eat, move and turn). Otherwise, the critter will have that ability to whatever degree the parameters indicate.
Sensor parameters:
- touchRange range
- How many spaces around the critter are detected for touch information. If this is one, it is the space directly in front of the critter. If it is 3, the front half of the critter's cells are detected. If it is 6 (the maximum value), all cells around the critter are detected.
- sonarResolution resolution
- Sonar rays are sent from the critter and detect the closest thing in each arc that the sonar has. resolution determines how many rays are sent. If sonar just has 3 rays, then the angle the sonar detects is divided into 3 parts and information for each part will return. A sonar with 6 rays can make even finer distinctions.
- sonarAngle angle
- The total arc swept by sonar is given by angle. resolution determines how this arc is divided into rays. An angle of 180 would let the critter detect things in front of it, but not behind. A sonar angle of 60 would be a very narrow arc directly in front of the critter. An angle of 260 gives a sonar detection all around the critter. However, resolution will be very important. An angle of 360 and resolution of 1 is almost useless.
- visualResolution resolution
- Just like sonarResolution, for the vision system.
- visualAngle angle
- Just like sonarAngle, for the vision system.
Effector parameters:
- hit n
- n is 0 (off) or 1 (on). When n is 1, the critter can hit things (rocks, plants, other critters). Some plants are "hard" and can't be eaten until they are "softened up" by hitting.
- move n
- n specifies how many cells in the critter's current heading it can move forward at one time (its range is 1..3). If n is one, critters can only creep around. If n > 1, critters can jump over things (assuming there is space on the other side. Thus, if n were 3, critters could move forward 1, 2 or 3 moves at a time (all lesser movements are also possible). Such a critter could jump over rock barriers 2-rocks thick.
- turn n
- n specifies how many cells (60-degree increments) at a time the critter can turn (its range is 1..5). If n is 1, the critter can turn 60 degrees at a time. After 6 turns, it would be facing where it started. If n is 5, the critter can turn to any heading instantly.
- rest n
- n is 0 (off) or 1 (on). When n is 1, the critter can rest, when it's 0, the critter can't.
Reinforcement learning parameters:
- learningRate r
- r can be any value between 1 and 10. The higher this number is, the faster the critter learns. However, too fast a learning rate can often be problematic. This value is multiplied by 0.01 for purposes of the actual reinforcement learning calculations (Q-learning).
- discountRate r
- r can be any value between 1 and 10. Each Q-value for the is used to determine a new Q-value for some action a in state s. If r is high, prior Q-values count more towards this calculation. Multiplied by 0.1 for Q-learning calculations.
- exploitationRate r
- r can be any value between 1 and 1000. The action with the highest activation is not always chosen. When r is high, a random action is more likely to result, despite the activation of each action. When r is low, the activation values have more effect on the action that is chosen for the critter at each time step. exploitationRate depends not only on r but on the critter's age. Older critters effectively lower their r. Multiplied by 0.001 for the purposes of computing critter actions after Q-values have been computed.
If you want to edit a critter type's parameters, open up its parameter file in your text editor, change the parameters you want, then save the changes. You then need to load in the critters from the Load critters menu option (under the File menu). (When you load critters, you will be asked for how many critters of that type should appear in the world (5 is the default). Type in the number, then press return or click OK.)
Environment files
A world consists of many parameters. First is a set of punishments and rewards for each of the critter actions. There are also specfications for the number of rocks and plants, how rocks and plants appear, and a few miscellaneous options.
Parameters relating to rocks and plants (and one for critters):
- nPlants n
- How many plants will be in the world at any time step. If plants are eaten, they will immediately be replaced until there are n plants in the world. Where they are placed is determined by another parameter.
- plantPlacement p
- Plants can be placed in several different ways. p=0 means they will be randomly placed (regardless of "fertile cells"). 1 means that plants are always placed at randomly chosen locations next to rocks, 2 means that they are never next to rocks. 3 means that plants are only placed where fertile cells have been specified.
- plantEdibility e
- If e is 1, all plants added to the world will need to be hit before they can be eaten. That is, all plants will initially be hard and hitting them will make them soft (edible). When e is 2, all plants are soft. When e is 0, half of the plants that appear will be hard, and the other half will be soft.
- nRocks n
- How many rocks will be placed randomly in this world. If the user has specified that rocks are to be placed using an environment file (the rockPlacement parameter), then this parameter is ignored.
- rockPlacement p
- When p is 0, rocks are randomly placed. When p is 1, rocks are placed according to the environment file.
- critterEdibility e
- If e is 0, critters can't be eaten; if it is 1, they can.
Parameters relating to costs/rewards of critter actions. All "Incr" values should be positive, and all "Decr" values should be negative.
- plantEatingIncr i
- The reward for eating plants. Should be positive.
- critterEatingIncr i
- The reward for eating critters. Should be positive.
- turnDecr d
- Cost for 1/6 of a revolution (60 degrees, or a one-cell turn). Thus, larger turns cost more than smaller ones. Should be negative (as with all of the decrements).
- moveDecr d
- Cost for moving one cell forward. Thus, multiple-cell moves ("jumps") cost more.
- stepDecr d
- An existence cost, per time step. All critters lose this regardless of their actions.
- hittingDecr d
- Cost of a hit action.
- eatingDecr d
- Cost of an eat action.
- collisionDecr d
- Cost of colliding with anything (rock, plant, critter).
- eatenDecr d
- Cost for being eaten (chewed upon by another critter).
Setup files
A setup file specifies what world and what critters are to be used. You can load in more critters than are specified in the setup file, if you wish, by using the Load critters menu option under File.
Notes and Advice
- Always turn off animation and show vision/sonar when running the simulation - only use these features when you are stepping the simulation.
- When creating a new world from scratch, remember that the last world that was loaded has specified the number of plants that should appear in the world. You must place at least that many fertile cells in the world. You might want to use your text editor to change a world's nPlants, then load that world, Reinit the world, and then place as many or few fertile cells as you wanted to.