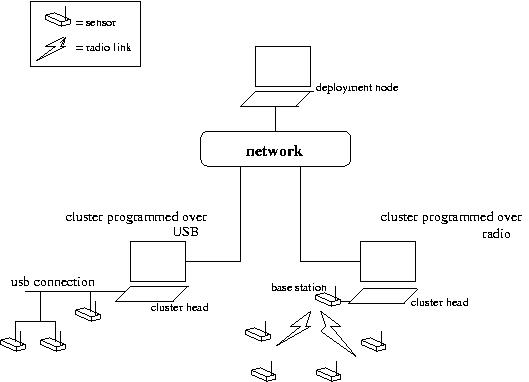
While my dissertation presents the high level motivation for this work, this writeup is meant to serve as a guide to setup and operate the associated prototypes. Due to constraints on available software, for the purposes of this prototype, a cluster is defined by a workstation with a set of sensor nodes in close proximity. The workstation fulfills the role of a cluster head, by executing appropriate software. It communicated with the various sensor nodes within its cluster through a 'base station node' connected to it through USB. The layout is illustrated in the figure below. As shown, a network may consist of multiple clusters, which are accessed and programmed remotely.

The system consists of software executing at three levels - within the sensor nodes, at the cluster head level and at the workstation level. The sensor nodes execute software implementing a sensor filesystem (SFS). The cluster head (a workstation in our case) utilizes the SFS exported from various sensor nodes to implement a cluster filesystem. The various cluster filesystems are mounted locally at the workstation level, which allows sensor network applications to interact with the sensor nodes through conventional file operations.
The first step in setting up the prototype is to program one or more sensor nodes and to get them running. The steps for achieving this are outlined below:
make reinstall,< com port> bsl,< network num>
Here 'com port' refers to the number of the assigned virtual COM port
at which the sensor node is connected in Unix format, with COM1
represented by '0', and moving upwards from there. For instance, using this representation, COM2
would be refered to by the number '1'. Network num refers to the integer
number identifying the network address of a sensor node. This should
start from 1 and increase incrementally. To program a sensor node that is
connected at COM2 with the sensorfs binary, while assigning it a
network address of 3, the following command is issued:
make reinstall,1 bsl,3
Workstations communicate with sensor nodes using base stations; these are sensor nodes that are connected to the workstations directly. The steps for setting up the base station are outlined below:
The procedure for setting up and executing this filesystem are listed below:
The cluster filesystem may be started from the command line by executing the following command:
java uk.ac.rdg.resc.jstyx.server.ClusterFS [number of sensor nodes]The number of sensor nodes specified should equal the number of sensor nodes programmed and started up in
Upon starting up, the cluster filesystem 'discovers' the various
sensor nodes present within the cluster and appropriately generates a
filesystem. During discovery, the cluster filesystem reads the
discovery resource of sensor nodes at increasing network numbers to
identify the resources on board each of them. Lookup Section 4.5 in
the thesis for more information on the discovery process. Based on the
information gathered during the discovery process, the cluster
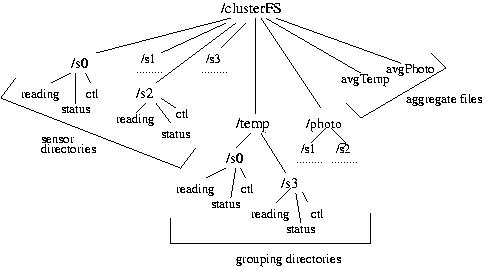
filesystem generates a namespace of the sort shown in below:

Multiple such 'clusters' may be setup based on the availability of
motes, each exporting its own cluster filesystem.
aes
Once Inferno is installed, start it up the emulator as follows:
emu -r[path to the root of inferno installation]
Mount each of the cluster filesystems locally
mount -A tcp![ip address of 9P fs]![port number] [path to where the filesystem should be mounted]
eg: mount -A tcp!129.79.246.181!9876 /tmp/sensornet/cluster0
cat /tmp/sensornet/cluster0/sensor1/tempsensor0
	snsrfd := sys->open("/tmp/sensornet/cluster1/sensor0/tempsensor0", sys->ORDWR);
 	n = sys->read(snsrfd, databuf, 5);
eventfd := sys->open("/tmp/sensornet/cluter1/sensor0/tempevent0", sys->ORDWR);
	# set threshold to 50 by writing to event file @ offset 1
	databuf[0] = byte(50+48);
  	n := sys->write(eventfd, databuf, 1);
As described in the dissertation, when sensor values exceeding this threshold are detected, an event is fired.
	# enable event notification by writing ASCII '1' to event file @ offset 0
	databuf[0] = byte(49);
  	n = sys->write(eventfd, databuf, 1);
This is done by writing the character '1' to the event file (writing '0' disables event notification).
	# wait for notification
 	sys->seek(eventfd, 0, sys->SEEKSTART);
  	n = sys->read(eventfd, databuf, 1); # blocking call
	sys->print("event recvd\n");
	# now react to the event
As with the earlier application, program the sensor nodes with the
sensorfs. This application is equipped with a TinyOS component
named 'Deluge' that makes remote reprogramming(deployment) of sensor
nodes possible. The network numbers assigned to the sensor nodes
should be incremental, starting with 1.
Program and attach a base station node to the workstation.
The cluster filesystem for the second application is implemented by the
ClusterFSprog.class available in the enclosed software. Setup the Java environment just as in the first
application by downloading the supporting classes and setting the
CLASSPATH variable. Then start up the cluster filesystem:
java uk.ac.rdg.resc.jstyx.server.ClusterFSprog [number of sensor nodes]
On a workstation, mount the exported filesystem within
Inferno, using the steps outlined for the earlier application. Example:
mount -A tcp!129.79.246.181!9876 /tmp/sensornet/cluster0
$ cat /tmp/sensornet/cluster0/platformtype
tmote
$ make `cat /sensornet/cluster0/platformtype` -C /sensorapps/RedBlink
sh script-program
As always, first program the sensor nodes with the sensorfs software.
The subsequent steps differ slightly between the USB and radio cases. Next, start up the cluster filesystem. Depending on whether programming needs to occur over radio or not, include the -r command line flag, as illustrated below:
java uk.ac.rdg.resc.jstyx.server.ClusterFSprog -r [number of sensor nodes]
Start up the ClusterProg filesystem as before:
java uk.ac.rdg.resc.jstyx.server.ClusterFSprog [number of sensornodes]This starts up a filesystem at port 9876, that enumerates the various sensor nodes present within the cluster and generates its namespace accordingly.
On the remote workstation, mount the various cluster filesystems from within Inferno as shown below:
mount -A tcp!129.79.244.162!9876 /sensornet/cluster0
mount -A tcp!129.79.246.180!9876 /sensornet/cluster1
The various sensor nodes being programmed have to be associated with the COM ports over which they are connected to the programming workstation. This is acheived by writing the address command with the appropriate COM port number to the sensor control file, as shown below. An improvement over the current implementation would be to enable this association to happen automatically.
echo -n 'address COM5' > /sensornet/cluster0/sensor0/sensorctlIn the above scenario, the sensor node '0' in cluster '0' has been registered at COM5 by the programming workstation.
The sensor binary that is to be deployed within the sensor nodes is then transferred to the cluster binary repository. This is acheived by first erasing the existing binary in the repository, by writing the 'e'(erase) command to the image repository control file (imagectl), as shown below:
# erase the existing image
cd /sensornet/cluster0
echo -n 'e' > imagectl
cat /usr/bpisupat/main.ihex > image
# tell the filesystem we are 'd'one
echo -n 'd' > imagectl
cd /sensornet/cluster0/sensor0
echo -n 'p' > sensorctl
java uk.ac.rdg.resc.jstyx.server.ClusterFSprog -r [number of sensornodes]
An advantage of this approach is that it can easily be scaled to configure and deploy large, heterogeneous sensor networks consisting of multiple clusters, each having numerous sensors. The basic programming operation outlined above, can be iterated upon for multiple sensor nodes by repeating them within loops as shown below:
for(c in /sensornet/cluster*) {
      cd $c

      #transfer the image to each cluster
      echo -n 'e' > imagectl
      cat /usr/bpisupat/main.ihex > image
      echo -n 'd' > imagectl

      #program each sensor

      for (i in $c/sensor*) {
          cd $i
          echo -n 'p' > sensorctl
      }

}