Example:
ADVANCE C:\DV C:\LE
During the advanced installation, messages will be
displayed indicating the progress of the installation. If there
is a conflict between one of the programs being installed and
another program already installed, an error message will be displayed
indicating that the program was not installed and installation
will proceed with the next program. Once the advanced installation
is complete, the programs will be available from the DESQview
Open Window menu the next time DESQview is started.
2.5 Starting Up the Logic Engine Software
After installing the Logic Engine Software, you should do the following:- Add LE to the PATH environmental variable in autoexec.bat
- Add the line set LE= LE to autoexec.bat
- Reboot
LE
 Figure 2. Logic Engine Menu
This will start up DESQview and bring up a menu as illustrated in Figure 1. DESQview should not be running before the Logic Engine Menu is started. The menu has five selections, one for each of the Logic Engine tools and one for DOS. To start up one of these programs, select it in one of four ways.
| (a) | Type the two letters on the right side of the selection. Example: Type PA to select the LE Panel Tool. |
| (b) | Use the cursor keys to highlight the selection then press the Space Bar or Enter Key. |
| (c) | Use the mouse to highlight the selection then press the left mouse button. |
If the Logic Engine menu is ever obscured by other windows, it can be raised by moving the mouse to a spot on the screen which is not occupied by a window and pressing the left mouse button.
If the Logic Engine software was installed using the advanced method, any of the Logic Engine tools can be started from the DESQview Open Window menu. See the DESQview manual for details about starting programs from the Open Window menu.
2.6 Installing Only the LE PI Library
If you desire to use only the LE PI library, it is possible to avoid installing DESQview and the Logic Engine software. To be able to link your own programs to the LE PI library you need two files off of the INSTALL diskette:
    \bin\lelib.lib

    \include\lelib.h
These can be copied to a convenient location on your hard disk. See 2.7 Installing the LE Board
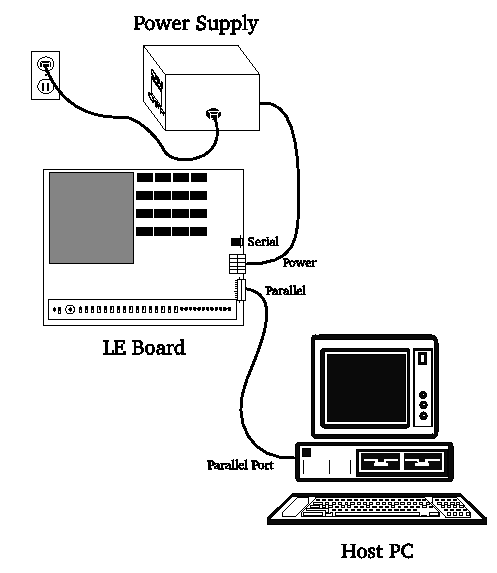
In order to operate the LE Board in a stand-alone fashion (no host PC), the power supply must be connected to the LE Board (see below) and plugged in and turned on. In order to operate the LE Board with the host PC, the parallel connector must also be connected to the host (see below.) Fig. 2 illustrates these connections.
There are three connectors located on the right side of the LE Board (board oriented with switches face up and forward.) These connectors are, starting closest to the right most button and moving away:
| Parallel Connector: | This is a male DB25 (25 pin) connector. It is connected to the host PC's parallel port (usually a female DB25 connector) via a male DB25/female DB25 parallel cable. This port is used for communication between the host PC and the LE Board. If any of the LE software is used to communicate with the LE Board, this connection must be made. |
| Power Connector: | This is a 5 conductor, unisex, color coded connector. It is connected to the power supply with an identical connector supplied with the power supply. This connection provides +5V, ground, -12V, +12V and 'power good' signals to the LE Board. The connection is made so that like colors of each connector match up. This connection must be made in order to use the LE Board. |
| Serial Connector: | This is a female DB9 connector. It is connected to the host PC's serial port (usually a male DB25 connector, sometimes a male DB9 connector) via a female DB9/male DB25(DB9) serial cable. This undedicated port is used to provide a serial port between the LE Board and the host PC. It is strictly for the designers use and is not used by any of the LE software. |
 Figure 3. Logic Engine/Host PC Connections
[Contents] [Prev: 1 Introduction] [Next: 3 Common User Interface]